Have you ever wanted to create your own coloring book to sell on Amazon KDP? With the help of Midjourney and Canva, it’s easier than ever before! In this post, we’ll guide you through the step-by-step process of creating a beautiful coloring book using Midjourney to create the coloring pages and Canva to format the book. We’ll also share tips on how to do niche and keyword research for coloring books. If you’re brand new to KDP, start here.
Our number one goal is to help readers learn about strategies to build passive income using tools such as AI. We regularly partner with companies that make reaching that goal easier. If a purchase or signup is made through one of our Partners’ links, we may receive compensation for the referral at no additional cost to you. Learn more here.
Why Create a Coloring Book to Sell on KDP?
Selling coloring books on KDP is a great way to turn your passion for art into a very profitable business. It’s fairly easy to make anywhere between $2,000 – $12,000 (or much more) a month selling coloring books on KDP, if you’re consistent. Coloring books are incredibly popular, and there is a high demand for unique and creative designs. Plus, creating a coloring book is a fun and rewarding experience that allows you to showcase your artistic skills and creativity.
You can even branch out and use your coloring pages in activity books. For example, if you want to create an activity book about mermaids… you could have some coloring pages of mermaids, some mazes for the mermaid to “swim” through, and wordsearch puzzles related to sea life. If you’re interested in creating activity books, check out this post.

Step-By-step guide to Creating a KDP Coloring Book With Midjourney
The tools you will need for this guide are: Midjourney, Canva (you can use the free version or get a 30-day free trial), and a keyword research tool- I recommend Publisher Rocket or Book Beam. Not sure which one? Learn more about Keyword Research Tools Here. You’ll also need a KDP Account. It’s easy and free to sign up to KDP. Once you have these tools, you’re ready to get started!
Step 1: Find a Profitable Niche
Before you can start creating your coloring book, finding the right niche and keywords is a crucial step. There are millions of books on Amazon, so if your niche is too broad, your book will probably never show up in the Amazon search results. When I first started out, I thought I could manually find a good niche by doing some searches on Amazon. It turned out to be a huge waste of time. I barely made any month for the MONTHS of work I spent creating my books. When I started doing proper research and finding niches that I could compete in, my sales took off.
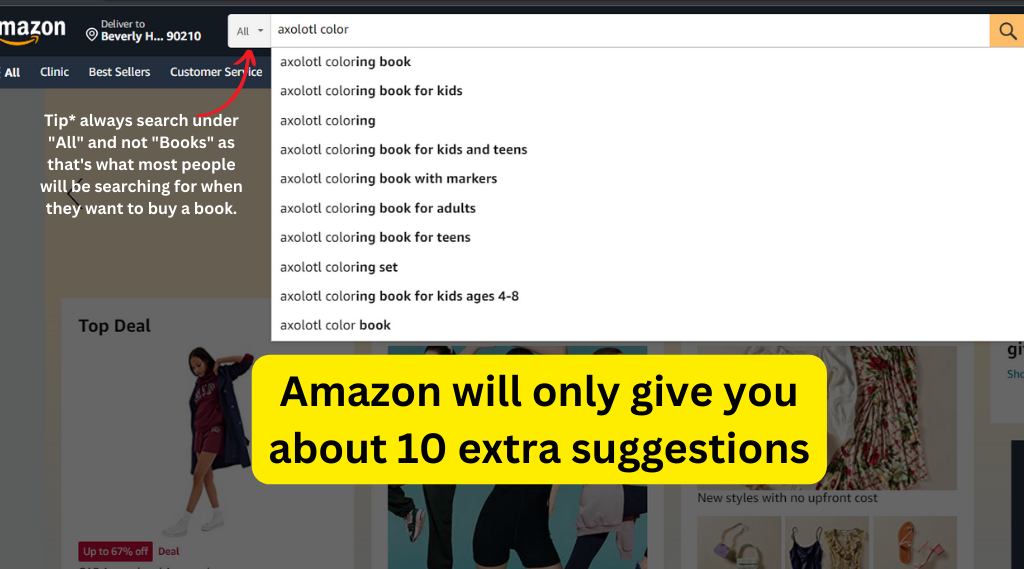
You want to find a niche that people are actually searching for, but isn’t oversaturated. One way to do this manually is to start typing in keywords in the Amazon search bar and see what Amazon auto populates. All of Amazon’s suggestions are books that people have actually searched for, so you know there’s at least some demand for the book. Then you want to choose one of those suggestions and see how much competition there is. If you are just starting out, I’d recommend looking for something that has fewer than 1,000 competitors.
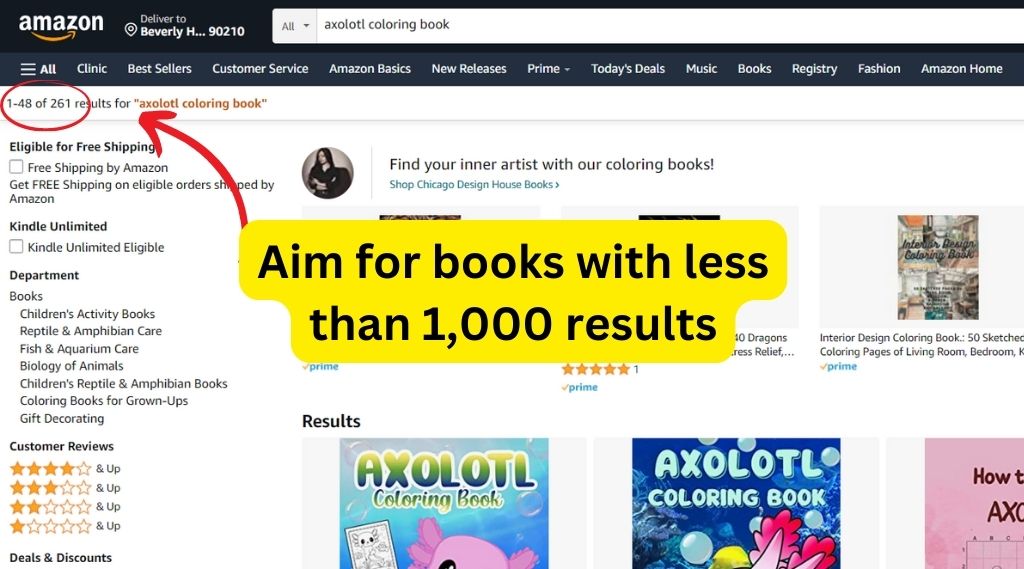
However, it’s really difficult to know the search volume of your niche if you are checking this manually. When I first started out, I got so excited to find “Axolotl Coloring Book” had such little competition. I created a book, and it just sat there. Turns out… not many people are searching for “Axolotl Coloring Book,” and those that do, typically purchase a book that already has lots of reviews.
It wasn’t until I started using Book Beam’s niche finder, that I was able to see that this niche was never going to be profitable for me. Tools like Book Beam can do all of the research for you. You put in an initial phrase, and it gives you a massive amount of suggestions to choose from. From there, you can filter by niches that only 5 reviews (or however many you are comfortable competing against). Book Beam offers a 14-Day Money Back Guarantee. You can choose to pay monthly or annually. If you get the monthly plan, use coupon code PASSIVEINCOMEAI50 to get 50% off your first month.
Not only will Book Beam help you find a profitable niche, it’s also an amazing tool to find keywords that you can use in your title, subtitle, description and the 7 backend keywords that Amazon allows you. Finding a profitable niche isn’t enough… you need to target low competiton keywords for your book to be found. Once you have a good niche, and you’ve found a list of competitive keywords on Book Beam, you’ll likely open the floodgates and the royalties will start pouring in.
Step 2: Create your Coloring Pages in Midjourney
Time to start creating your pages . First, I would check to see how many images you will need. Go to a competitor’s book on Amazon that is doing well, and see how many pages their book has. *Tip: For coloring books, you want to leave a blank page behind your image to avoid bleed through. So if you see a book that has 80 pages, they likely only have 40 images.
Once you know how many images you need, sign into Midjourney and start creating! I’d recommend starting out with simple prompts, as MJ can get a bit confused if your prompt is too complex. Also, keep in mind that MJ prioritizes the first few words of your prompt, so put the important words first e.g. “a coloring page of…” or “subject doing an activity in the style of a coloring page”. If you need prompt inspiration, click here for 11 easy prompts to create coloring pages.
Save your images
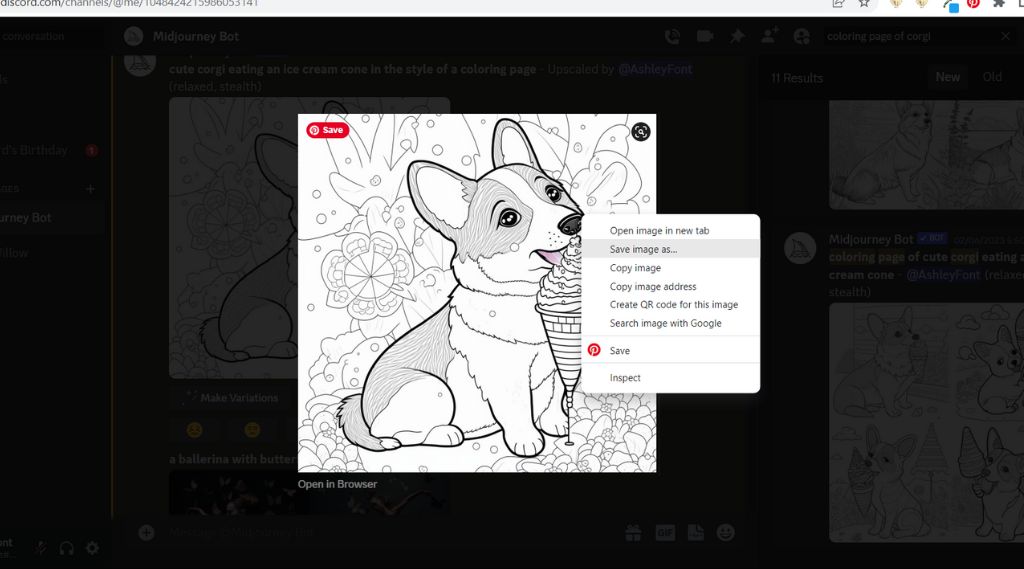
To save an image, click on it and it will enlarge. Then right click and “save as” a PNG file. Save it to a new folder on your computer. Keep all of your images for each coloring book in a separate file to stay organized.
Midjourney pro tips
Get unlimited renders: For a seamless experience, the first thing I would do is switch to relax mode by entering “/relax” in Discord. I work primarily in relax mode and switch to “/fast” only for maximum upscales or when time is limited. Relax mode offers unlimited renders at no extra cost.
Chat with the bot: The MJ discord channels get very hectic with everyone’s images. To avoid clutter in public channels, message the MidJourney Bot and create all of your pages within the chat. You’ll only see your work that way. Note that your images and prompts will still be public on the MidJourney website, unless you opt for Private mode at an additional cost. Personally, I don’t bother with the private subscription because there are so many images out there, that A.) It’s unlikely someone will even see mine and B.) Even if they do, MJ produces a new result each time.
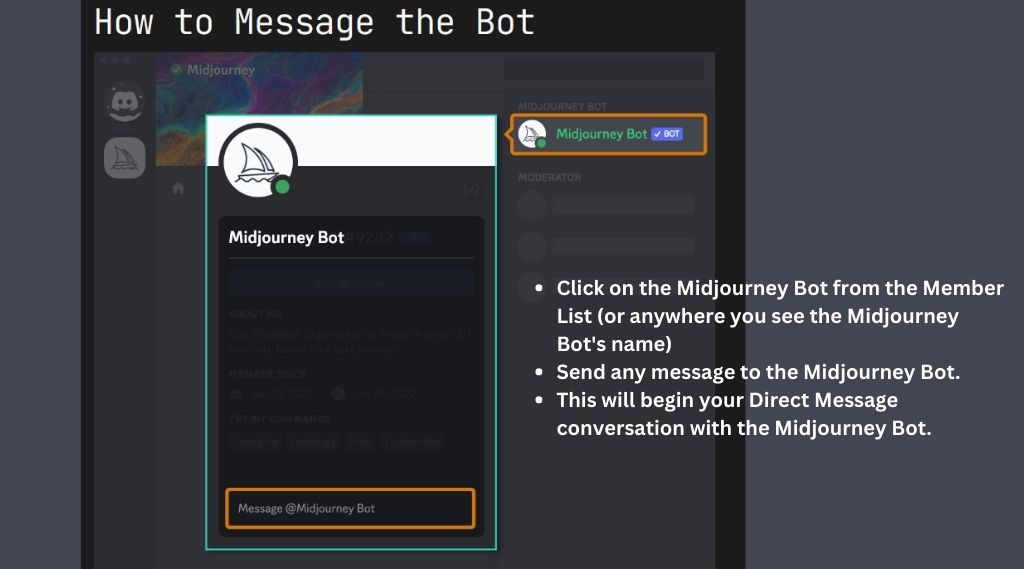
To sign up for MidJourney, follow these steps:
- Create a free Discord account if you don’t have one.
- Accept the MidJourney Invite on Discord.
- Type “/subscribe” and follow the link to choose a plan.
- I recommend the $30 per month Standard Plan for unlimited image rendering in “relax mode.” You can literally create 100s of coloring books this way.
- Avoid the $10 plan as it doesn’t include “relax mode” and will exhaust your GPU hours quickly.
- Despite the initial cost, the $30 plan offers great value, allowing thousands of renders at a low price per image.
Don’t underestimate the benefits of monthly payments; it’s a steal considering the number of coloring pages you can generate. If you get stuck, check out Midjourney’s Quick Start Guide.
step 3: Create the Interior of your Coloring Book with Canva
Once you’ve created and have saved your Midjourney images, you’re now ready for the next step in creating a KDP coloring book… adding your images to Canva. But first, you need to know the size of your page. To do this, I’d check out your competition on Amazon and see what size the most popular coloring books in your niche are. To do this, click on a coloring book to go to it’s product page and scroll down until you see the product details. Oftentimes, coloring books are 8.5×11 inches.

Once you know the size of the book you’ll be creating, head over to Canva and follow these steps:
Step 1: Sign Up or Log In Visit the Canva website and sign up for a free account. You will need to use the Pro version to be able to download your final product, but you can get a 30-day free trial. If you already have an account, log in to access Canva’s design features.
Step 2: Create a New Design Once you’re logged in, click on “Create a Design” from the homepage. In the search bar, type “custom dimensions” and select “Custom Dimensions” from the dropdown menu.
Step 3: Set Custom Dimensions In the Custom size window, enter the width as 8.5 inches and the height as 11 inches. These dimensions represent the standard 8.5×11 inch paper size for your coloring page. Click “Create New Design” to proceed.
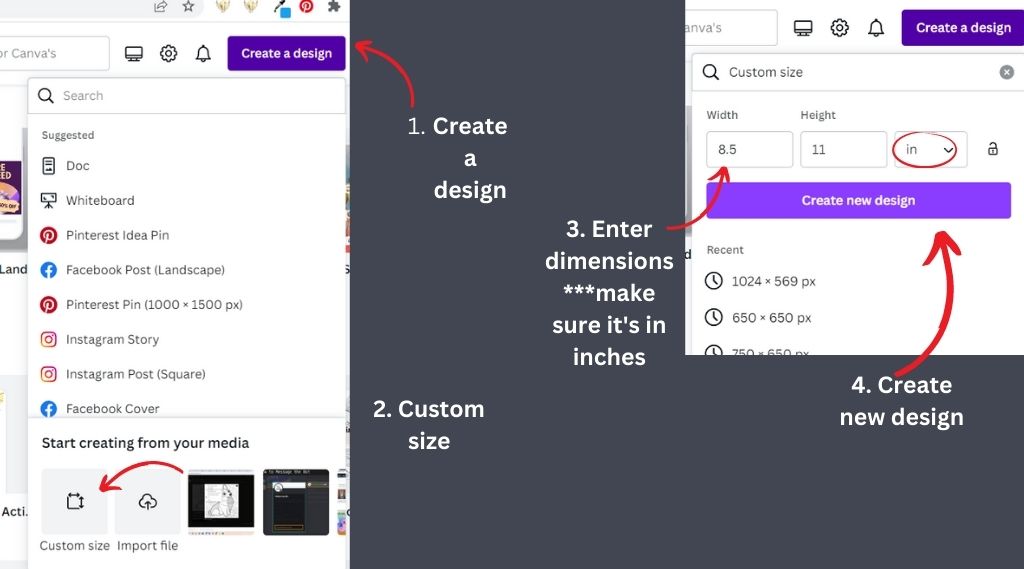
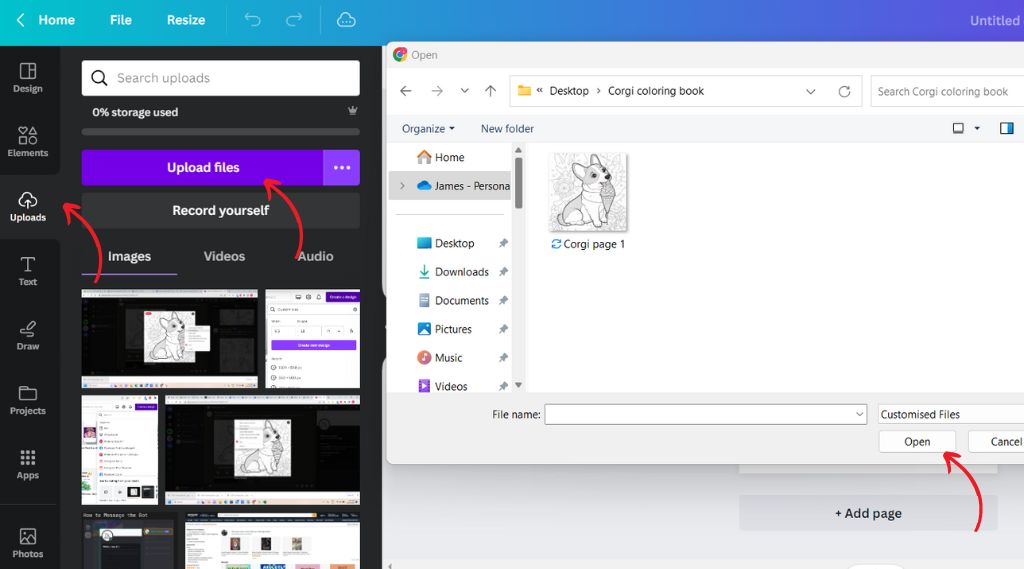
Step 4: Upload Your Own Images With your blank canvas ready, you can now upload your own images for the coloring page. Click on the “Uploads” tab on the left sidebar. Choose the file(s) from your computer and wait for the upload to complete.
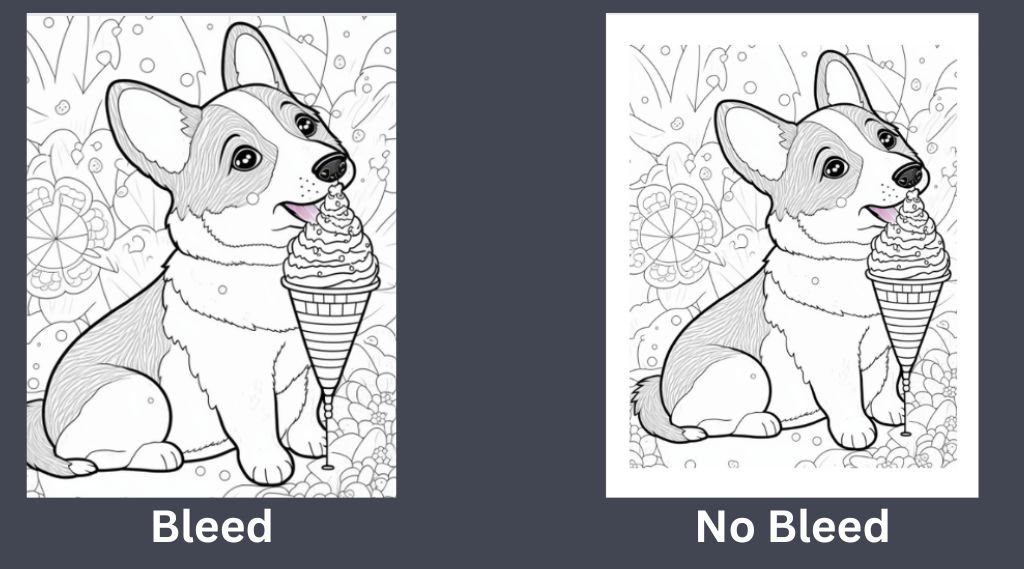
Bleed vs No Bleed- Important to know before arranging images:
In the context of KDP (Kindle Direct Publishing), “bleed” refers to the area of a page that extends beyond the final trim size. When a design has bleed, it means that the images or background colors extend all the way to the edges of the page, without any white borders. On the other hand, “no bleed” means that there is a white border around the edges of the page, ensuring that no content gets cut off during the printing and trimming process.
For coloring pages, it is generally recommended to use the “no bleed” option. Coloring enthusiasts often prefer to color within the boundaries of a defined image, and having a white border around the page helps to keep the coloring contained and visually separate from the surrounding elements. Make sure to leave a white border around the edges of the canvas to achieve the “no bleed” effect when arranging your images on the page.
Step 5: Arrange and Position the Images Drag and drop the uploaded images onto the canvas. Resize and position them as desired. You can also duplicate and rotate the images if you want to create patterns or repetitions on the page. Experiment with different placements until you’re satisfied with the arrangement.
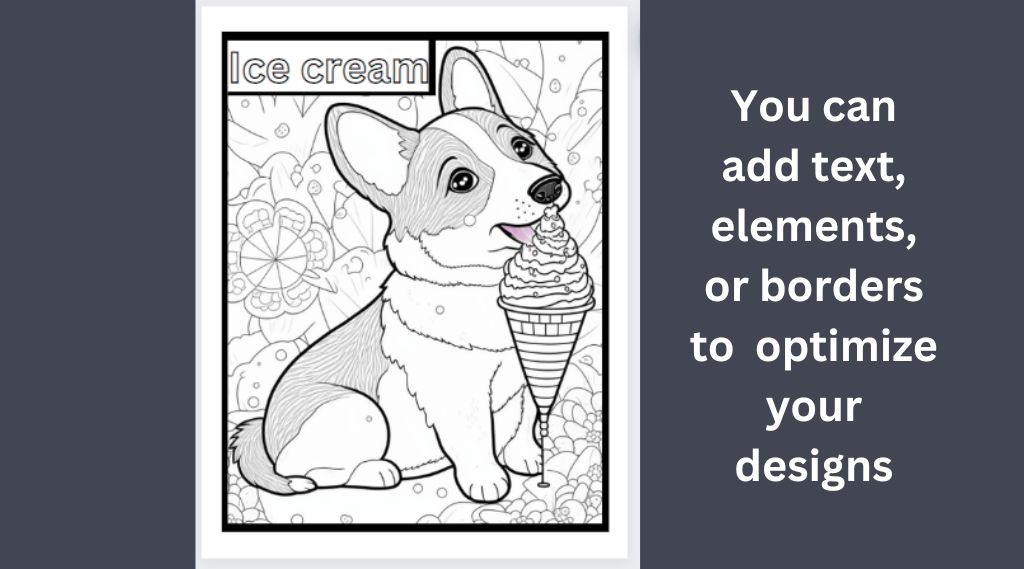
Step 6: Add Text or Prompts (Optional) If you want to include text or prompts on your coloring page, click on the “Text” tab in the left sidebar. Select a text element and drag it onto the canvas. Customize the text by choosing the font, size, color, and other formatting options. Position the text near the image or wherever you feel it works best.
Step 7: Add Elements (Optional) You can add elements to your page to create an even better experience for your user (which results in more positive reviews). For example, in my Corgi coloring page, I can add dog paws, dog bones, trees or leaves etc. You can also add a border around your image. Search for rectangular border in elements.
Step 8: Add any additional pages Make your coloring book professional by adding additional pages such as a “This book belongs to _____”. You can check to see what pages your competitors have at the front of their books with the “Look Inside” feature on Amazon. Here is an example from a Space activity book I created:
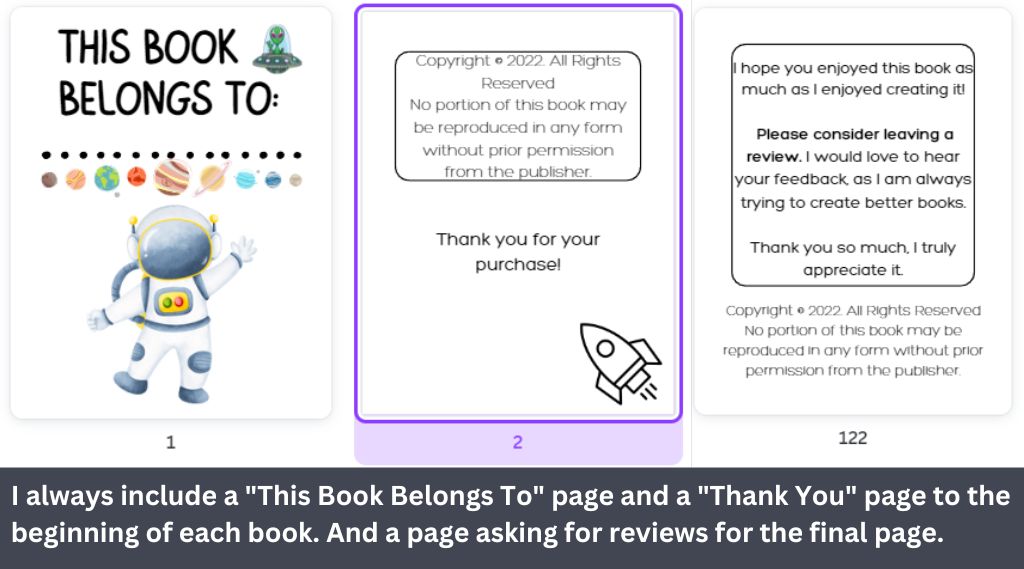
Pro tip: The pages with images should be on odd number pages. So your first coloring page will be Page 3.
Step 9: Review and Finalize Take a moment to review the overall layout and content of your coloring page design. Ensure that the images and text are positioned correctly and that everything is visually appealing. Adjust any elements as necessary, checking for alignment, spacing, and readability.
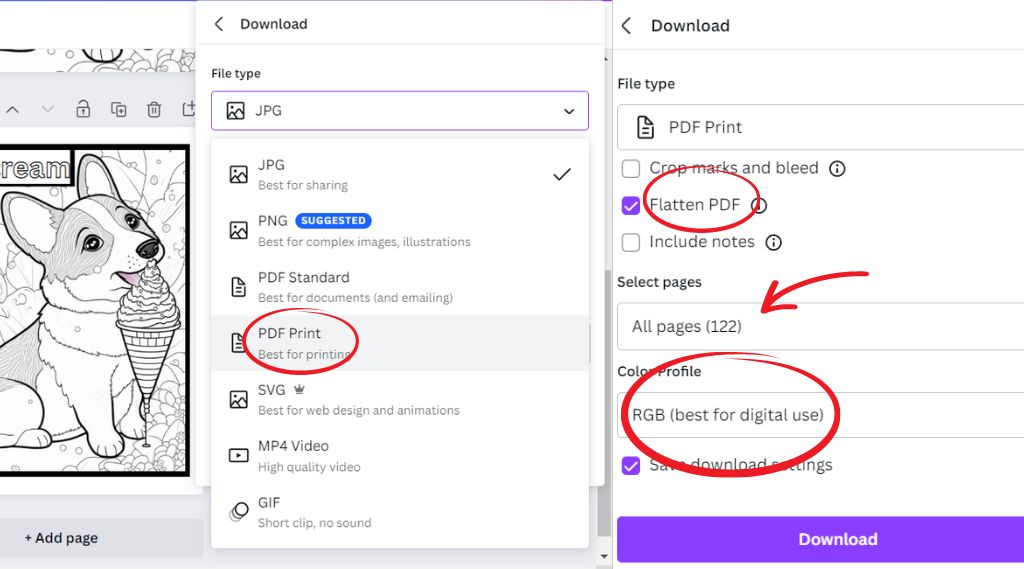
Step 9: Download and Save When you’re satisfied with your coloring page design, it’s time to download it. Click on the “Share” button at the top right corner of the Canva editor then click “Download”. Choose “PDF Print,” “Flatten PDF”, “all pages” and color profile = RGB. RGB is fine for black and white pdfs, which your coloring book will be. However, your cover design will need to be downloaded as CMYK because it will be printed in color. This is a Canva Pro feature. If you don’t have Canva Pro, you can get a 30-day free trial. Once you’ve downloaded your, save the file to your computer. I usually save it as “Coloring Book Name Interior”.
Step 4: Create a Cover for Your KDP Coloring Book
The easiest way to create a KDP coloring book cover is by using Canva Pro. As mentioned earlier, you’ll need Canva Pro to be able to download your cover in CMYK. Alternatively, you can hire a freelancer on Fiverr to do the whole thing for you at a decent price.
Whether you decide to do it yourself or not, you’ll need to know the dimensions of your cover. Head over to the KDP Cover Calculator and enter your book information. For example:

Then click “Calculate dimensions,” then “Download the template”. This will download a zip file. You’ll need the PDF version from the zip file. Head back over to Canva, create a new design, and enter the dimensions found on the template.

Once you have your blank canvas in the new dimensions, upload the PDF so you can be sure to work within the borders. You don’t want to have any elements or text touching any of the red on the template. You also don’t want to cover the yellow square where the barcode will be. That’s it… you are ready to begin designing your cover! Keep in mind that the right-hand side of the template will be the front cover, so you’ll want to make sure that the title of your coloring book is prominent there.
The cover of your coloring book is the first thing potential buyers see, and it plays a crucial role in grabbing their attention. To ensure your coloring book stands out among the competition, it’s essential to create an eye-catching cover that captivates and entices readers. Check out what’s working for your competition. What colors and fonts do they use? Get inspiration, but don’t copy them. Make yours better than theirs!
When you’ve finished your cover, it’s time to download it. Similarly to your interior, you’ll want to click on “Share,” “Download,” and “PDF Print”. However, this time, you’ll choose “CMYK” for the color profile. This is really important because you want Amazon to print the absolute best version of your cover. Download and save the cover to your computer. I usually save mine as “Coloring Book Name Cover”.
Tips for Creating an Eye-Catching Cover for Your KDP Coloring Book in Canva:
- Understand your target audience: Consider the preferences, interests, and age group of your target audience to design a cover that resonates with them.
- Experiment with colors: Use bold, vibrant colors or soothing, pastel tones to evoke emotions and attract attention. Ensure your color scheme complements the theme of your coloring book.
- Select legible fonts: Choose fonts that are easily readable and complement your theme. Create visual hierarchy by using different fonts for the title, subtitle, and author name.
- Create a focal point: Place a visually striking illustration or image as the central focus of your cover to grab attention.
- Test for legibility: Ensure that the title and subtitle are easily readable even in thumbnail size. Adjust font size, color, or position if necessary.
- Seek feedback: Share your cover design with others and gather feedback to refine and improve your design. Consider the perspectives of friends, fellow artists, or potential readers.
- Maintain consistency: Ensure that your cover design aligns with the content and style of your coloring book. Consistency in visuals and branding helps create a cohesive and professional look.
- Keep it simple: Avoid overcrowding the cover with too many elements. A clean and simple design often has a greater impact.
Step 5: Upload your book to Amazon KDP!
You’ve done all of the hard work. Now it’s time to upload your book to Amazon’s platform and wait for the sales to come in. Head over to your KDP and sign in or create an account. Click “Create,” then follow the prompts.

Now remember earlier when we talked about niche and keyword research? Here’s where you’ll put all of those keywords you got from Book Beam or Publisher Rocket to good use!
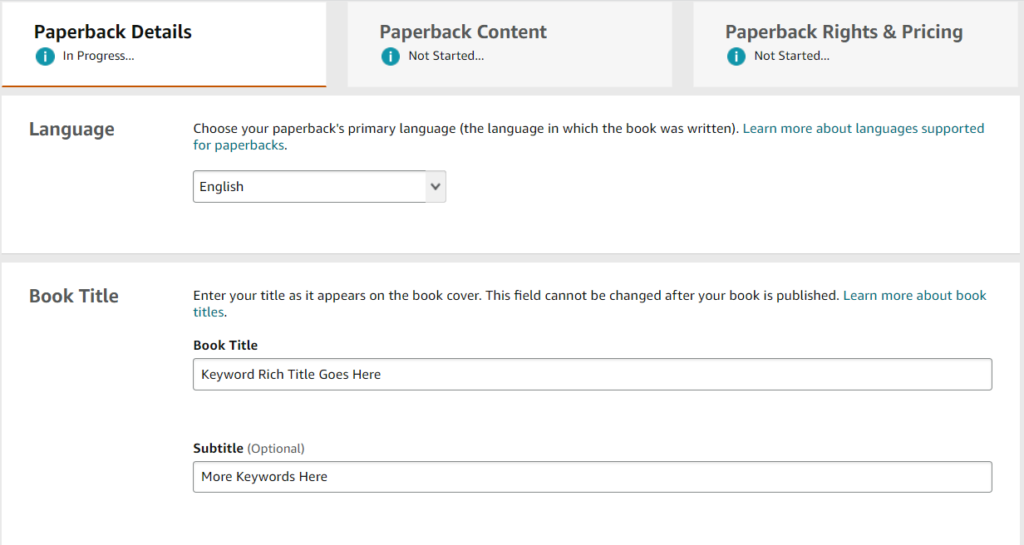
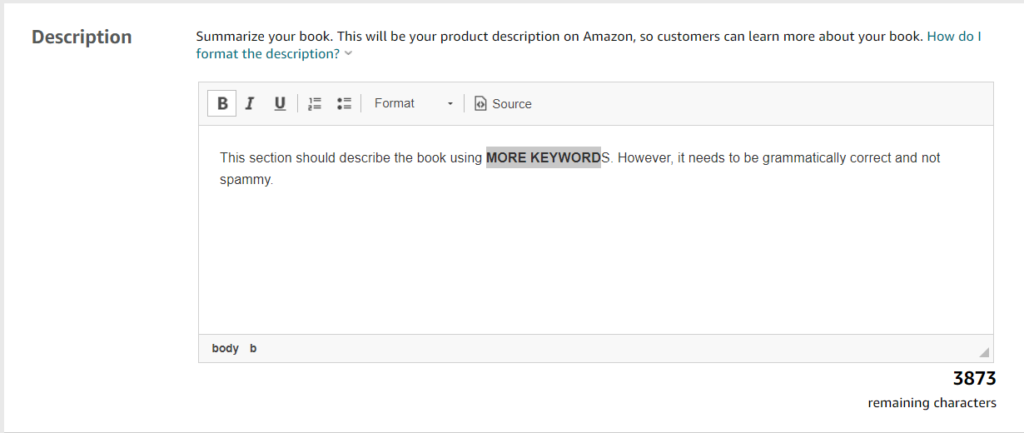
Be sure to include a compelling description. Add keywords, but avoid keyword stuffing because you don’t want to come across as spammy. And definitely check to make sure you’ve spelled everything correctly and it’s grammatically correct. If your description has any kind of error, people will assume the interior of the book is also filled with errors.
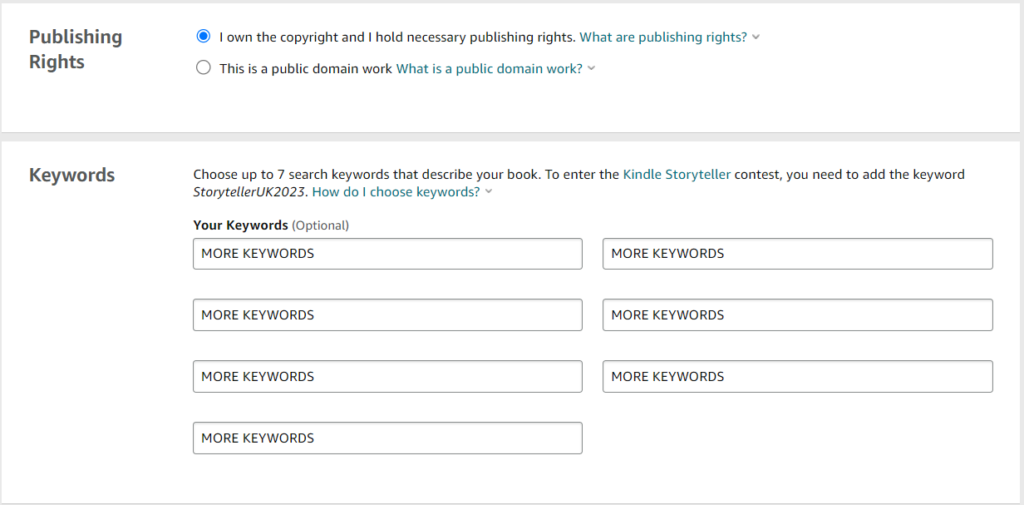
Amazon allows you to enter 7 backend keywords. It’s optional, but I would STRONGLY encourage you to use them. This is how your book gets found, so it’s so important to have keywords here that you can actually compete for. For example, everyone uses keywords like “coloring book,” so using this keyword phrase would make your book the virtual needle in a haystack. That’s why people who use keyword tools like Book Beam or Publisher Rocket sell tons of books, while those who don’t, never see a sale.
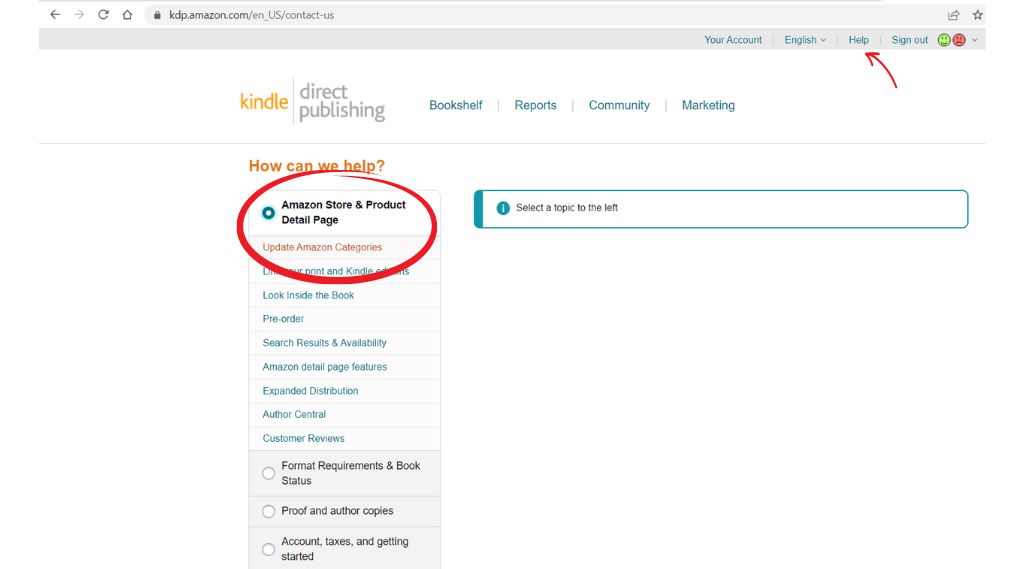
Next, you need to choose your categories. Pro tip* You can actually have your book listed in 10 categories. You simply contact KDP and request the categories you want to be added to after your book is live.
Listing your book in 10 categories on Amazon KDP is important because it increases visibility, targets specific readers, enhances discoverability, provides a competitive advantage, expands genre reach, maximizes sales potential, and allows for flexible marketing and promotions. It helps your book reach a broader audience and improves its chances of being seen by potential readers. If you are using Book Beam, you can use their “Category Explorer” feature to quickly filter through 45,000 categories to find the best 10 for your book.
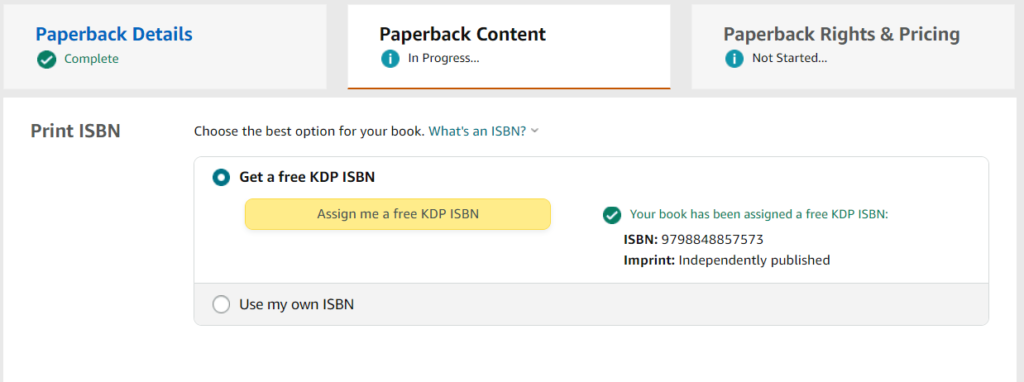
Once you’ve submitted all of the information for the “Paperback Details” tab, click save and continue to be taken to the next page. Here on the “Paperback Content” tab, you’ll enter the details of your book and finally upload the interior (manuscript) and cover! It’s completely up to you how you want to fill this section out, but this is what I typically choose:
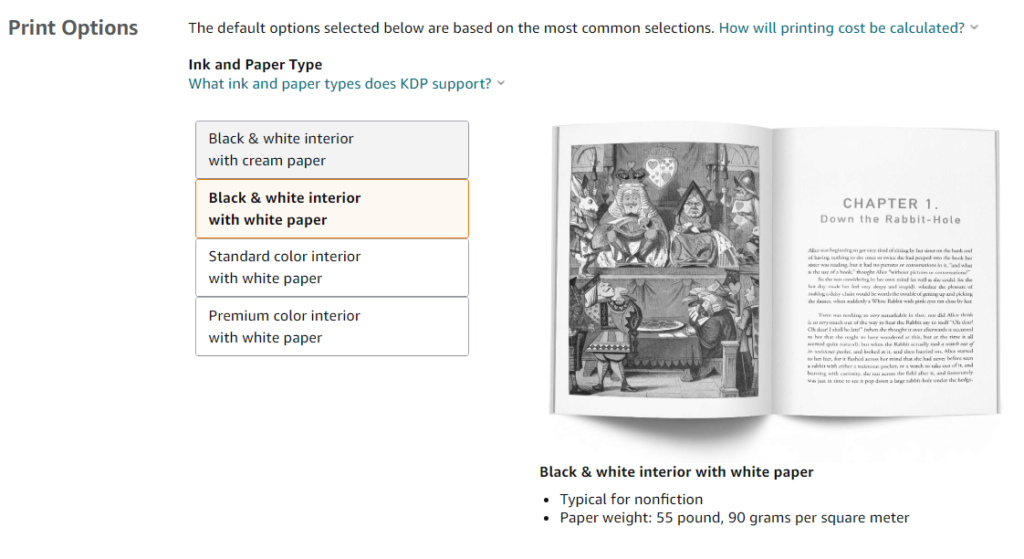

Once you’ve uploaded the interior and cover, click “Launch Previewer”. This can take a few minutes for Amazon to do a quality check. Once it’s complete, Amazon will either let you know that there were no errors, or it might show you that some elements are touching borders that will be cut off when printed. If that’s the case, you simply need to go back to your design in Canva, fix the issues and redownload your pages.

After you’ve made and approved any changes, it’s time to choose the pricing and publish your book! When considering pricing, I’d aim for a price similar to your competitor’s. You don’t want to go too cheap or people will assume your book is poor quality. But you also don’t want to overprice your book, as that will deter people from buying. Also, consider the price as a whole. Psychologically, we prefer to buy a $7.99 book instead of an $8.12 book. Once you’ve decided on a price, it’s time to click the “Publish” button.
Congrats, you are now a published author!!!
conclusion
In conclusion, creating and selling your own coloring book on Amazon KDP can be a rewarding and profitable venture. By following the step-by-step guide we’ve provided, utilizing the powerful tools of Midjourney and Canva, and conducting thorough niche and keyword research, you can increase your chances of success in this competitive market.
Launching your coloring book on Amazon KDP opens up opportunities for passive income and the chance to share your artistic talents with a wide audience. Stay consistent in your efforts and follow these steps to create a thriving coloring book business. Get started today, and let your creativity flourish while enjoying the rewards of sharing your art with the world.
Tools for success:
Midjourney – Create beautiful coloring pages with this text-to-image AI software
Canva Pro free 30-day trial – Upload your images and format your KDP book. Use text and elements to make your KDP coloring book fun and unique.
Publisher Rocket or Book Beam – These keyword tools will help you profitable niches and competitive keywords… essential to your success on KDP. If you decide to use Book Beam, use code PASSIVEINCOMEAI50 to get 50% off the first month of the monthly plan.
Fiverr – (Optional) Fiverr is a freelancing platform that connects you with skilled professionals for various services, such as illustration, graphic design, editing, and proofreading, allowing you to outsource specialized tasks and improve the quality of your coloring book’s content.
Happy Publishing!
